Sunday 30 September 2012

Triple Chocolate brownie

Triple Chocolate brownie [COOKIE version]

Hanielas - original recipe

Currently trying out this recipe from Hanielas's blog. Loving the texture ! :)

Ingredients
- 6 TBSP (85 grams) butter roughly chopped
- 2 oz 100% unsweetened chocolate
- 1 cups sugar
- 2 eggs room temperature
- 3/4 cup ( 90 grams) all-purpose flour
- 1/4 cup (20 grams) unsweetened cocoa
- 1 TSP (4 grams) baking powder
- pinch of salt
- 3/4 cup dark chocolate chips


Directions
  1. In a small saucepan, over low heat melt butter and chocolate (100%) . Set aside and leave to cool completely.
  2. When cooled transfer to a mixing bowl. With the paddle attachment on start mixing slowly adding the sugar and eggs, one by one. Beat until combined and smooth.
  3. In another bowl sift together the flour, cocoa powder, baking powder and salt. Slowly add them to the wet mixture.
  4. With a spatula mix in the chocolate chips.
  5. Cover and refrigerate about 2 hours until the dough is easy to handle.
  6. Preheat the oven to 350F (176 C). Grease two baking sheets or line them with parchment paper.
  7. With an ice-cream scoop or a tablespoon drop cookie dough on prepare baking sheets 2 inch apart. Bake in preheated oven for 8-10 minutes until the edges are set and top is slightly cracked.  Cool at least 10 minutes on the baking sheets before removing them.

Monday 10 September 2012

Recipes to try out

 I decided to keep all the recipes i searched and wants to try baking here because there are litterally THOUSANDS i wanted to try out. But all the Recipes i bookmarked got lost some where, or i just couldn't find it.


Chocolate


Vegetables and Fruits


--- Blogs to whizz through

Low Fat - Banana Bread

Low Fat - Banana Bread

Link to Recipe

Banana! Classic way to use over ripe bananas... BANANA BREAD!

This recipe is from Joyofbaking.com 


Ingredients: 

1 cup (240 ml) mashed ripe bananas (about 2 large bananas)
1 teaspoon baking soda
1/2 cup (120 ml) low-fat plain yogurt
1/4 cup (60 ml) canola, vegetable, or corn oil < I used light Olive oil - no smell at all >
3/4 cup (165 grams) light brown sugar   < I actually used only 1/2 a cup, and it's perfect. Keep in mind how ripe your banana's are >
1 large egg or 2 large (60 grams) egg whites
1 teaspoon pure vanilla extract
1 cup (130 grams) all-purpose flour
1/2 cup (65 grams) whole wheat flour
1/2 teaspoon ground cinnamon
1 teaspoon baking powder
1/4 teaspoon salt

Low Fat Banana Bread: 

  1. Preheat oven to 350 degrees F (180 degrees C) and place the rack in the center of the oven. Spray an 8 x 4 inch (20 x 10 cm) loaf pan with a nonstick vegetable cooking spray.
  2. In a large bowl, mix the mashed bananas with the baking soda and yogurt. Allow to sit while you prepare the rest of the batter.
  3. Meanwhile, in a separate bowl, whisk together the oil, sugar, egg or egg whites, and vanilla.
  4. In another large bowl, whisk together the flours, baking powder, ground cinnamon and salt.
  5. Then combine the banana mixture with the oil mixture and then add to the flour mixture. Stir just until all the ingredients are moistened. Pour into the prepared pan and smooth the top. Bake for about 45 - 55 minutes, or until a toothpick inserted in the center of the loaf comes out clean.
  6. Remove from oven and place on a wire rack to cool.

Makes one loaf (about 12 slices).
Adapted From:


Butter Cupcake

Butter Cupcake

I mixed the ingredients exactly as the recipe called for but i bake them in the cupcake cups instead of directly on the cake pan.

Texture and taste: Nice, Moist, a little dense though, but i think that was because of how i mix it, ( i didn't use room temperature butter)

บัตเตอร์เค้ก Butter Cake (เค้กเนยสด)


เค้กเนยสดที่มีขั้นตอนการทำไม่ยุ่งยาก เหมาะกับผู้ที่เริ่มหัดทำเค้กใหม่ๆ หอม หวาน และมันตามแบบฉบับดั้งเดิมค่ะ

สูตรบัตเตอร์เค้ก Butter Cake (เค้กเนยสด)


สำหรับ 10 ชิ้นเล็ก หรือ 1 ปอนด์
เวลาในการทำ 1 ชม. 15 นาที

อุปกรณ์

1. ที่ร่อนแป้ง
2. ตระกร้อตีไข่
3. ชามผสม
4. พิมพ์
5. ตะแกรง
6. พายยาง

ส่วนผสมบัตเตอร์เค้ก Butter Cake (เค้กเนยสด)

1. เนย 150 กรัม
2. น้ำตาลไอซิ่ง 100 กรัม
3. ไข่ไก่ 3 ฟอง
4. กลิ่นวนิลา 1 1/2 ช้อนชา
5. แป้งเค้ก 150 กรัม
6. ผงฟู 1/2 ช้อนชา

วิธีทำบัตเตอร์เค้ก Butter Cake (เค้กเนยสด)

1. อุ่นเตาที่อุณหภูมิ 175 องศาเซลเซียล
2. ทาเนยบนพิมพ์ที่เตรียมไว้จนทั่ว
3. ร่อนแป้งเค้กและผงฟูเข้าด้วยกัน พักไว้
4. ตีเนยจนเป็นครีม ใส่น้ำตาลไอซิ่ง
5. ตีผสมจนเข้ากันดี
6. ใส่ไข่ไก่และกลิ่นวนิลา ตีต่อจนเข้ากัน
7. ค่อยๆใส่แป้งและผงฟูที่ร่อนรวมกันไว้แล้วจนหมด
8. ผสมให้ส่วนผสมทั้งหมดเข้ากันเป็นเนื้อเดียว
9. ตักใส่พิมพ์ที่เตรียมไว้
10. นำเข้าเตาอบ 25-30 นาที
11. เมื่อสุกนำออกมาพักบนตะแกรงจนเย็น แต่งหน้าเค้กตามชอบ

Butter cake Demonstration Video

Red velvet cupcake

Red Velvet Cupcake

Red velvet cupcake Yesterday, I've tried baking from a recipe posted on Foodtravel.tv 's website.

Click Here for the recipe

เรด เวลเว็ท คัพเค้ก Red Velvet Cupcake


Red Velvet Cupcake คือคัพเค้กที่มีเนื้อเค้กเป็นสีแดงสด ทานคู่กับtopping ที่เป็นครีมชีสจะเข้ากันมาก ส่วนเนื้อเค้กของ red velvet จะกลางๆ ไม่เบาขนาด soft cake หรือชิฟฟ่อน และไม่หนักขนาดมัฟฟิ่น มีกลิ่นหอมเฉพาะที่ไม่เหมือนคัพเค้กตัวอื่นๆ

What i think:
I think that the finished product is yummy, but as i didn't fully mix the ingredients up well, there are lumps of flour. So I will definitely come back to try this recipe again.

The taste:
This is a very moist Cupcake and the frosting tastes delicious, creamy, little sour and sweet.


สูตรขนมเรด เวลเว็ท คัพเค้ก Red Velvet Cupcake


อุปกรณ์---------------------------------------------Equipments

1. เครื่องผสม -------------------------------------- Mixer Stand
2. ไม้พายยาง ------------------------------------- Rubber Spatula
3. ช้อนตวง ---------------------------------------- Measuring spoons
4. ถุงบีบ ------------------------------------------- Piping Bag
5. หัวบีบcake ------------------------------------- Piping Point
6. ถ้วยcupcake ---------------------------------- Cupcake Liner / Cupcake Paper
7. ถาดเข้าเตาอบ---------------------------------- Baking Tray

ส่วนผสมเรด Red Velvet Cupcake --------Ingredients

สำหรับ 10 ชิ้น -------------------------------------- For 10 Cupcakes

• เนื้อเค้ก -------------------------------------------- Cake Mixutre

1. เนย 70 กรัม  ------------------------------------- Butter 70 grams
2. น้ำตาล 50 กรัม  --------------------------------- Sugar 50 grams
3. ครีมชีส 30 กรัม  --------------------------------- Cream Cheese 30 grams
4. ไข่ 1 ฟอง  ---------------------------------------- 1 Egg
5. แป้งเค้ก 150 กรัม  ------------------------------- Cake Flour 150 grams
6. ผงฝู 1 ชต.  --------------------------------------- Baking powder 1 tbsp
7. ผงโกโก้ 1 ชต.  ----------------------------------- Cocoa powder 1 tbsp
8. โยเกิร์ต 1 1/3 ถ้วยตวง  ------------------------- Plain yogurt 1 1/3 Cups 
9. สีแดง ½ ชต.  ------------------------------------- Red food coloring 1/2 tbsp
10. น้ำส้มสายชู 1 ½ ชช.  ------------------------- Distilled Vinegar 1 1/2 tsp

• Topping Cream cheese  ------------------------ Cream cheese topping

1. ครีมชีส 360 กรัม  ----------------------------------- Cream Cheese 
2. ไอซิ่ง 120 กรัม  ------------------------------------- Icing Sugar
3. วนิลา 2 ชช.  ---------------------------------------- Vanilla Extract
4. ผิวเลม่อน ½ ลูก  ------------------------------------ Lemon Zest 1/2 lemon
5. เยลลี่ หรือเกล็ดน้ำตาลตามใจชอบ  --------------- Decorations

วิธีทำเรด เวลเว็ท คัพเค้ก Red Velvet Cupcake

1. อุ่นเตาอุณหภูมิ 160-175 องศา
2. ตีเนย ครีมชีส และน้ำตาล ให้เข้ากันจนเป็นเนื้อครีม (เริ่มจากสปีดต่ำ)
3. ผสมไข่ โยเกิร์ต น้ำส้มสายชู สีแดง และผงโกโก้ เข้าด้วยกัน
4. ใส่ส่วนผสมไข่ลงในส่วนผสมแรก
5. ผสมด้วยสปีดต่ำจนเข้ากันดี
6. ร่อนแป้งและผงฟู
7. ใส่ลงในอ่างผสม ผสมด้วยสปีดต่ำจนส่วนผสมเข้าเป็นเนื้อเดียวกัน
8. ตักใส่ถุงบีบ
9. บีบใส่ถ้วย cupcake 2/3 ของถ้วย
10. นำเข้าเตาอบ 25 นาที
11. เริ่มทำ Topping Creamcheese
12. ตีครีมชีสจนเป็นเนื้อcream เนียน ประมาณ 5 นาที
13. ใส่ไอซิ่ง และวนิลาค่อยๆเริ่มตีจากความเร็วต่ำ (ไอซิ่งจะได้ไม่ฟุ้ง) ประมาณ 3 นาที จนเป็นเนื้อครีม ไม่มีใตเม็ดๆไอซิ่ง จับตัวกันเป็นก้อน
14. ปิดเครื่องใส่ผิวเลม่อน คนให้เข้ากันด้วยไม้พาย
15. ตักใส่ถุงบีบ
16. หลังจากพัก cupcake ที่อบสุกให้เย็นแล้ว แต่งหน้าด้วย topping cream cheese
17. โรยและแต่งหน้าด้วยเยลลี่ หรือเกล็ดน้ำตาล ตามใจชอบ

Directions:

  1. Warm up the oven at 165 degree Celsius
  2. Beat Butter, Cream cheese, and Sugar together < Texture: creamy >
  3. Mix Egg, Yoghurt, Vinegar, Red food coloring, and Cocoa together < Texture: mixed >
  4. Mix the Egg mixture (3) to the Butter mixture (2) , < Texture : fully combined >
  5. Sift All purpose flour and Baking powder together
  6. Mix Flour mixture (5) to the Egg and Butter Mixture (4)
  7. Spoon the mixture into the piping bag
  8. Pipe up to 2/3 of the cupcake cups
  9. Bake for 25 minutes < Inset the stick and comes out clean >
  10. Start making the Cream cheese topping
  11. Cream the Cream cheese until it is smooth , ( Leave the Cream cheese out of the fridge until it is at room temperature makes this part easier )
  12. Add the Sifted Icing Sugar and mix together until there are no lumps of icing left.
  13. Use a rubber spatula to fold in lemon Zest
  14. Spoon the mixture into a piping bag
  15. Wait for the cupcake to cool down, (not warm) then pipe the Cream cheese frosting
  16. Decorate the cupcake with the decorations

    Link to the video of how to make Red velvet Cupcake

Saturday 8 September 2012

Non-bakery: Pat-preaw-warn (thai sour and sweet stir fry)


จาก ครัวบ้านพิม [สูตร ผัดเปรี้ยวหวานโบราณ]
http://pim.in.th/images/all-side-dish-pork/sour-and-sweet-stir-fry/sour-and-sweet-stir-fry-05.JPG
ซึ่งผัดเปรี้ยวหวานแบบไทยๆ เราในสมัยก่อนเนี่ย .. ส่วนใหญ่ก็จะหน้าตาคล้ายๆ กับที่พิมทำนี่แหละค่ะ ประมาณว่าบ้านไหนทำออกมาก็จะหน้าตาเหมือนๆ กัน ....  แต่มาสมัยนี้นอกจากผัดเปรี้ยวหวานแบบไทยโบราณอย่างที่พิมทำให้ดูนี่แล้ว ก็ยังมีผัดเปรี้ยวหวานแบบไทยสมัยใหม่ที่ออกจะคล้ายสไตล์จีน ๆ  ที่จะเอาเนื้อสัตว์เช่น กุ้ง หมู เนื้อ หมึก ไปคลุกแป้ง+ทอดให้กรอบก่อน แล้วค่อยเอามาผัดกับผักจำพวกสับปะรด พริกยักษ์สีแดงเหลืองเขียว  หอมใหญ่  และมีแบบซอสเปรี้ยวหวานแห้ง ๆ แค่พอเคลือบผักกับเนื้อสัตว์เท่านั้น  จะไม่มีน้ำๆ เปรี้ยวหวานแบบในภาพด้านบนอ่ะค่ะ .... ซึ่งพิมก็เคยทำอยู่ แต่...ไม่ค่อยถูกโฉลก (แปลว่าไม่ชอบ) สักเท่าไหร่  แต่หากเพื่อนๆ คนไหนอยากดู req. มาได้นะคะ วันหลังพิมจะได้ทำมาฝากกัน  ..... แต่วันนี้ดูแบบไทยๆ บ้านๆ ไปก่อนล่ะกันค่ะ ^^
http://pim.in.th/images/all-side-dish-pork/sour-and-sweet-stir-fry/sour-and-sweet-stir-fry-07.JPG
http://pim.in.th/images/all-side-dish-pork/sour-and-sweet-stir-fry/sour-and-sweet-stir-fry-03.JPG
ซึ่งเมื่อดูหน้าตาไปแล้ว ก็มาดูส่วนผสมกับวิธีทำกันนะคะ
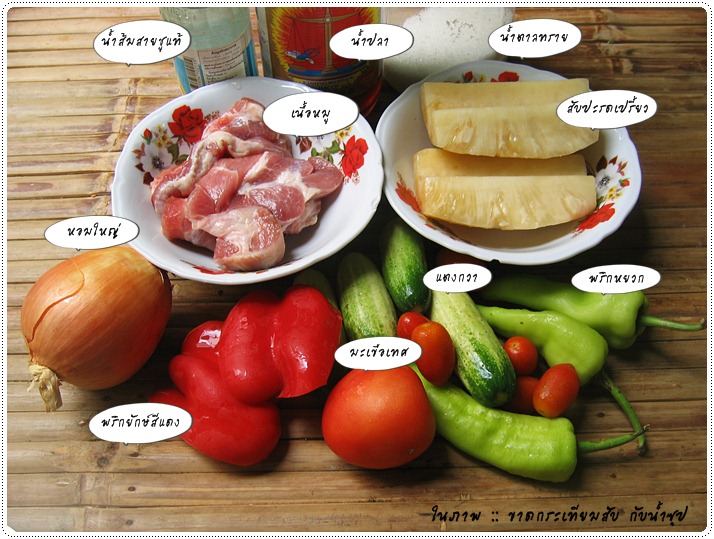
:: ส่วนผสมและเครื่องปรุง ::
- เนื้อหมู 150 กรัม
- สับปะรด (เปรี้ยว) 100 กรัม
- แตงกวาลูกเล็ก 3 ลูก
- มะเขือเทศท้อลูกใหญ่ 1 ลูก
- มะเขือเทศราชินี 6 ลูก
- หอมใหญ่หัวใหญ่ 1/2 หัว
- พริกหยวกสีเขียวอ่อน 3 เม็ด
- พริกยักษ์สีแดง 1/4 ผล
- กระเทียมสับ 1 ชต.
- น้ำส้มสายชูแท้ 1 1/2 ชต.
- น้ำตาลทราย 1 2/3 ชต.
- น้ำปลาดีๆ 1 - 1 1/2 ชต. ........ (อันนี้พิมไม่แน่ใจว่าพิมใช้ไปเท่าไหร่แน่นะคะ พอดีลืมจด แต่ประมาณนี้แหละ)
- น้ำซุป 1/3 ถ้วย
- น้ำมันพืชสำหรับผัด 2 ชต.
ป.ล. น้ำซุป - กระเทียมสับ - น้ำมันพืช ไม่มีในภาพนะคะ ลืมหยิบมาถ่ายรูปด้วย ^^"
http://pim.in.th/images/all-side-dish-pork/sour-and-sweet-stir-fry/sour-and-sweet-stir-fry-09.JPG
:: รายละเอียดส่วนผสมและวิธีทำ ::
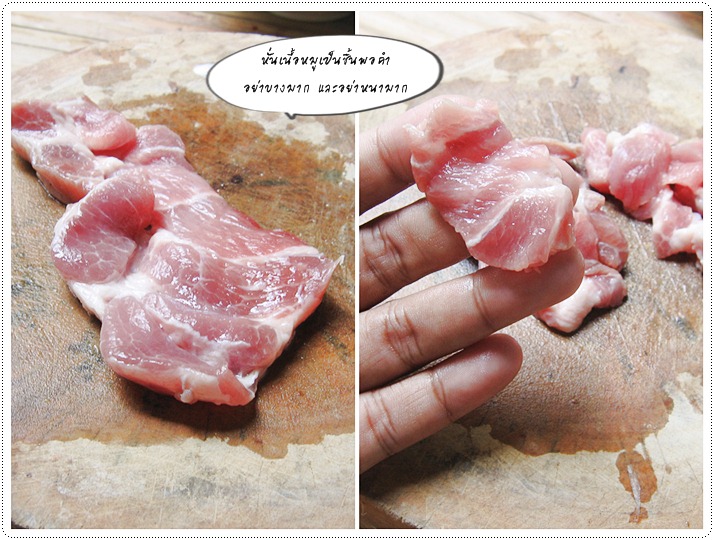
เริ่มต้นเลย...เราก็มาดูที่เนื้อหมูกันก่อนนะคะ  ซึ่งวันนี้พิมขอเลือกใช้เนื้อส่วนสันคอค่ะ เพราะว่ามันมีอยู่ในตู้เย็นแล้ว ไม่ต้องเสียเงินซื้อเพิ่ม ^^" (แถมนุ่มอร่อยด้วยน๊า)..... แต่หากเพื่อน ๆ จะใช้เนื้อส่วนอื่นเป็นสันใน เนื้อแดง เนื้อส่วนสะโพกก็ได้นะคะตามชอบเลย  แต่หากเป็นเนื้อส่วนสันนอก พิมว่ามันจะแข็งไปหน่อย หากมี..เก็บเอาไว้อบน่าจะดีกว่าอ่ะค่ะ ^^
ก็เอาเนื้อหมูมาทำความสะอาดนะคะ จะล้างน้ำหรือจะเช็ดด้วยผ้าชุบน้ำสะอาดบิดหมาดๆ ... ก็ตามถนัดเลยค่ะ เสร็จแล้วก็เอามาหั่นให้เป็นชิ้นพอคำนะคะ ไม่ต้องให้หใญ่นัก และให้ความหนากำลังดี อย่าบางไป หนาไป จะไม่อร่อยค่ะ ... หั่นเสร็จก็พักเอาไว้ก่อน
http://pim.in.th/images/all-side-dish-pork/sour-and-sweet-stir-fry/sour-and-sweet-stir-fry-16.jpg
ต่อมาก็มาจัดการกับผักต่างๆ ที่เราต้องใช้กันค่ะ .....
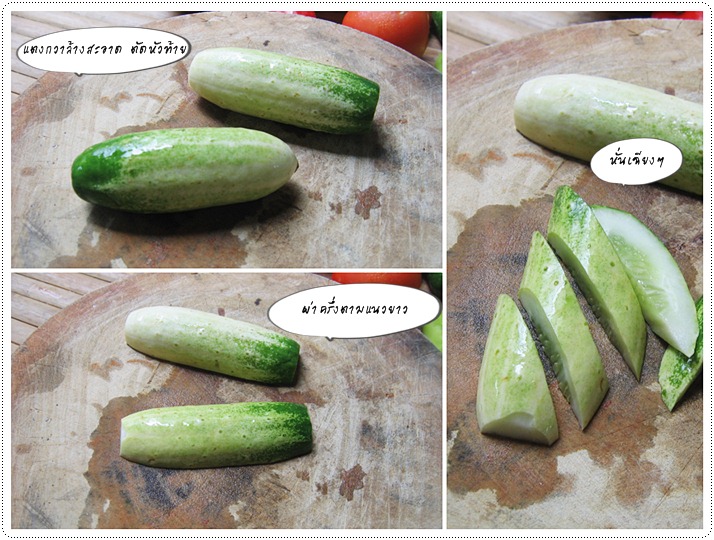
อย่างแรกก็คือ แตงกวา .... ให้เลือกใช้แตงกวาที่สดใหม่นะคะ เพราะว่าแตงกวาที่สดใหม่ จะมีความหวานอยู่ในตัวของเค้าเอง อีกทั้งมีความกรอบ เนื้อแน่น กินแล้วจะไม่แหยะอ่ะค่ะ .... พอเราได้แตงกวามา ก็ให้เราล้างน้ำให้สะอาด ตัดหัวตัดท้ายที่เป็นจุกทิ้งไป  ผ่าครึ่งลูกตามยาว แล้วก็เอามาหั่นเฉียงๆ ไว้อ่ะค่ะ
ป.ล. ไม่แนะนำให้ใช้แตงล้านค่ะ แม้จะคล้ายกับแตงกวาก็ตาม
http://pim.in.th/images/all-side-dish-pork/sour-and-sweet-stir-fry/sour-and-sweet-stir-fry-11.jpg
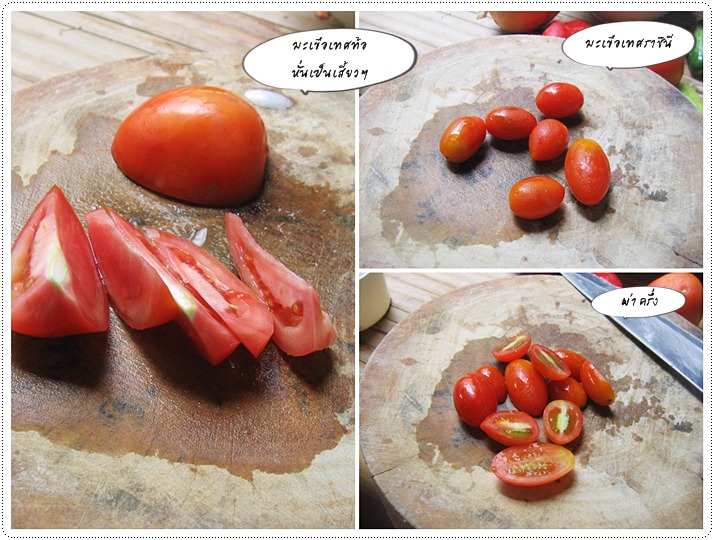
ต่อมาเป็นมะเขือเทศนะคะ วันนี้พิมขอใช้ทั้งสองแบบเลยเพราะว่ามีอยู่ในตู้เย็น  แต่หากใครมีแบบไหนแบบเดียว จะใช้อย่างเดียวก็ได้ค่ะ ^^ (ปกติพิมก็ใช้แต่มะเขือเทศท้อลูกใหญ่อย่างเดียวเหมือนกันค่ะ)
ก็เอามะเขือเทศท้อล้างให้สะอาด ตัดจุก (ขั้ว) ออก  ผ่าครึ่งลูกตามยาว แล้วก็หั่นเป็นเสี้ยวๆ นะคะ .... ส่วนมะเขือเทศราชินี เนื่องจากว่าลูกเค้าเล็กอยู่แล้ว  หลังจากล้างน้ำเสร็จ ผึ่งให้สะเด็ดน้ำ เอามาผ่าครึ่งก็พอค่ะ
http://pim.in.th/images/all-side-dish-pork/sour-and-sweet-stir-fry/sour-and-sweet-stir-fry-12.jpg
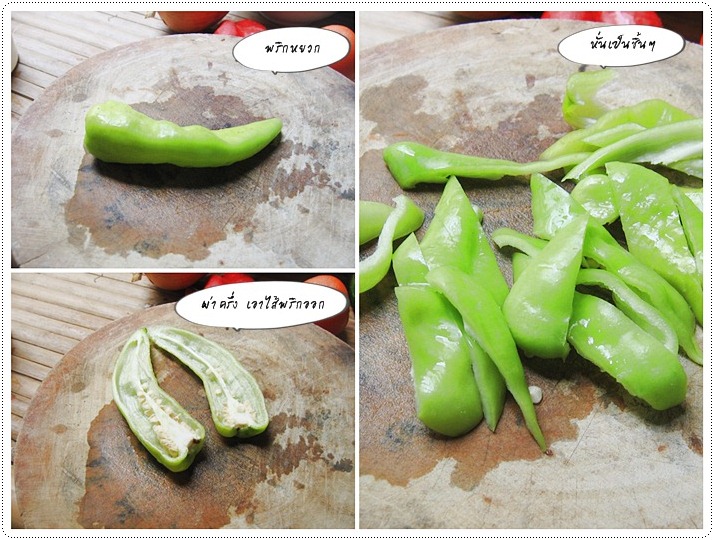
ส่วนพริกหยวก หลังจากตัดขั้วล้างน้ำแล้ว ก็เอามาผ่าครึ่ง เอาไส้+เมล็ดพริกทั้งหมดออก  แล้วก็หั่นเป็นชิ้นๆ แบบในภาพนี่นะคะ
http://pim.in.th/images/all-side-dish-pork/sour-and-sweet-stir-fry/sour-and-sweet-stir-fry-130.jpg
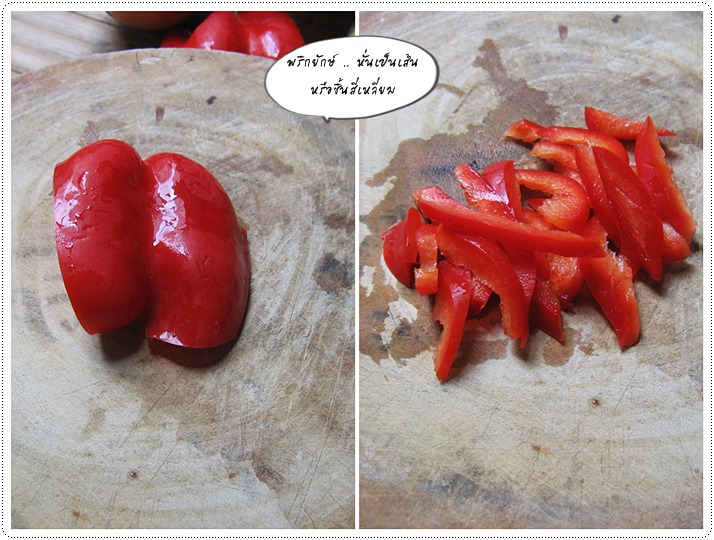
พริกยักษ์สีแดงก็เช่นกัน  ... หลังจากผ่าออกมาเป็นชิ้นใหญ่แล้ว ก็ให้เอาไส้ขาว ๆ ออก แล้วก็หั่นเป็นเส้นสั้น ๆ แบบในภาพอ่ะค่ะ (หรือใครจะชอบหั่นแบบสี่เหลี่ยมก็ได้นะคะ แต่พิมว่าแบบเส้นๆ อย่างนี้กินง่ายกว่าจ้า)
http://pim.in.th/images/all-side-dish-pork/sour-and-sweet-stir-fry/sour-and-sweet-stir-fry-10.jpg
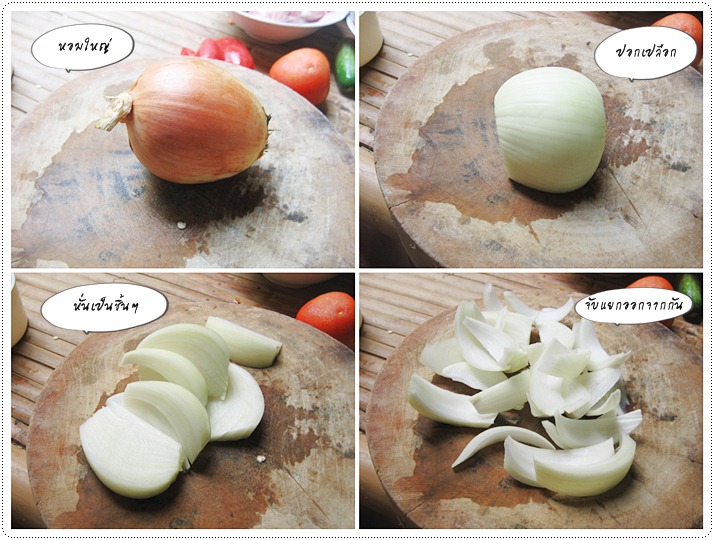
ส่วนหอมใหญ่ .... หลังจากปอกเปลือก  ก็ให้เอามาหั่นเป็นชิ้นใหญ่ๆ หน่อยนะคะ (เพราะพอผัดแล้ว มันก็จะเหี่ยวลงอีก) .....  หั่นเสร็จแล้ว ก็อย่าลืมจับแยกออกจากกันให้เป็นชิ้นเดี่ยว ๆ อ่ะค่ะ
http://pim.in.th/images/all-side-dish-pork/sour-and-sweet-stir-fry/sour-and-sweet-stir-fry-14.jpg
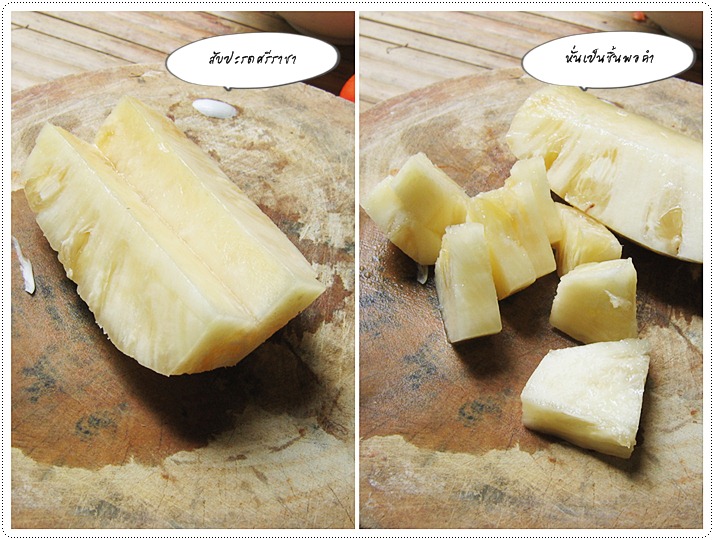
และสุดท้าย ... สับปะรด พิมเลือกใช้สับปะรดพันธุ์ศรีราชาซึ่งมีรสเปรี้ยว (รสหวาน เอามาผัดแบบนี้ จะไม่ค่อยอร่อย) .....  เอามาหั่นเป็นชิ้นพอคำแบบในภาพค่ะ
ป.ล. สับปะรดอันนี้มีที่มาแบบว่าชวนเซ็งมากเลยค่ะ คือพิมน่ะไปห้างชื่อดังกับคุณสามีวันก่อน  แล้วก็ไปเดินในซุปเปอร์ของเค้าค่ะ ปรากฎว่าเจอสับปะรดน่ากินมากๆๆๆๆ  แต่แอบราคาแพงอยู่ 3 ชิ้นเล็กๆ 58 บาท ก็เลยถามคุณสามีว่าซื้อดีไหม อยากกินอ่ะ แต่กลัวจะไม่หวาน  คุณสามีก็ว่า หวานอยู่แล้วแหละ ของในห้าง แถมราคาสูงกว่าข้างนอกเยอะเลยอ่ะ เค้าต้องคัดมาแล้วแหละ  ... พิมก็เลยซื้อค่ะ แต่ปรากฎว่า พอมาถึงบ้าน แกะกิน ... มันเปรี้ยวปรี๊ดดดดดด เลยค่ะ เปรี้ยวจนกินไม่ได้อ่ะ  ก็เลยต้องเก็บใส่ถุงใส่ตู้เย็นเอาไปแปรรูปทำอย่างอื่นแทน  >_<" .... เซ็งมากมายขอบอก เง้ออออ
http://pim.in.th/images/all-side-dish-pork/sour-and-sweet-stir-fry/sour-and-sweet-stir-fry-15.jpg
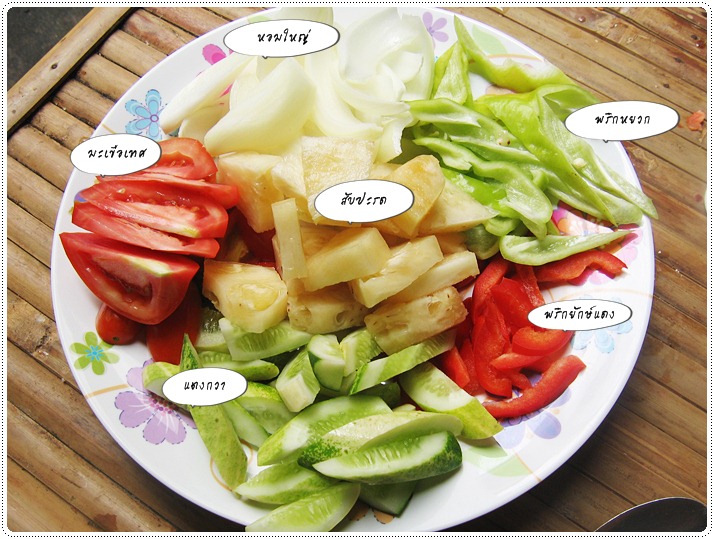
และนี่ก็คือผักต่างๆ  ที่เราหั่น และจัดเตรียมไว้ ... นะคะ
http://pim.in.th/images/all-side-dish-pork/sour-and-sweet-stir-fry/sour-and-sweet-stir-fry-19.JPG
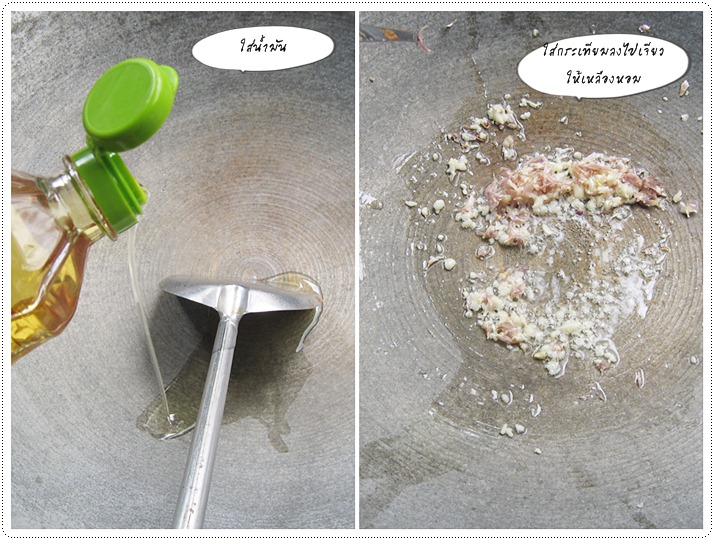
เมื่อเราเตรียมทุกอย่างเสร็จเรียบร้อย ก็มาลงมือทำกันเลยค่ะ ... เริ่มต้นก็เอากระทะที่เราจะใช้ผัด ตั้งเตานะคะ เปิดไฟเตากลาง ๆ ใส่น้ำมันพืชสำหรับผัดลงไปประมาณ 2 ชต. ..... และพอน้ำมันเริ่มร้อน (ไม่ต้องรอให้ร้อนจัด) ก็ใส่กระเทียมที่เราสับเอาไว้  (ไม่มีในภาพข้างบน)  ลงไปเจียวให้เหลืองหอมค่ะ
http://pim.in.th/images/all-side-dish-pork/sour-and-sweet-stir-fry/sour-and-sweet-stir-fry-17.jpg
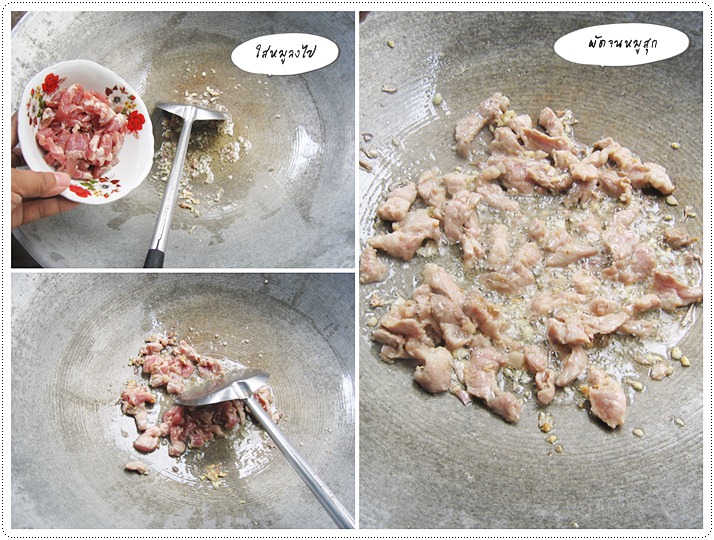
พอกระเทียมเริ่มเหลืองหอมดี  ก็ใส่หมูที่เราหั่นไว้แล้วลงไป ... ผัดจนกระทั่งหมูสุกดีนะคะ
http://pim.in.th/images/all-side-dish-pork/sour-and-sweet-stir-fry/sour-and-sweet-stir-fry-18.jpg
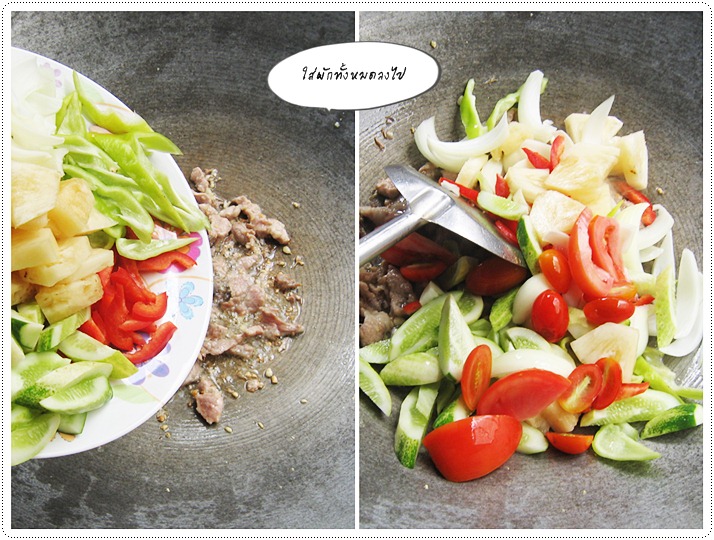
พอหมูสุก ก็ใส่ผักทั้งหมดลงไป
http://pim.in.th/images/all-side-dish-pork/sour-and-sweet-stir-fry/sour-and-sweet-stir-fry-20.jpg
แล้วก็เติมเครื่องปรุงรสต่างๆ  ไม่ว่าจะเป็นน้ำตาลทราย น้ำส้มสายชู น้ำปลา รวมไปถึงน้ำซุปด้วยค่ะ
http://pim.in.th/images/all-side-dish-pork/sour-and-sweet-stir-fry/sour-and-sweet-stir-fry-21.jpg
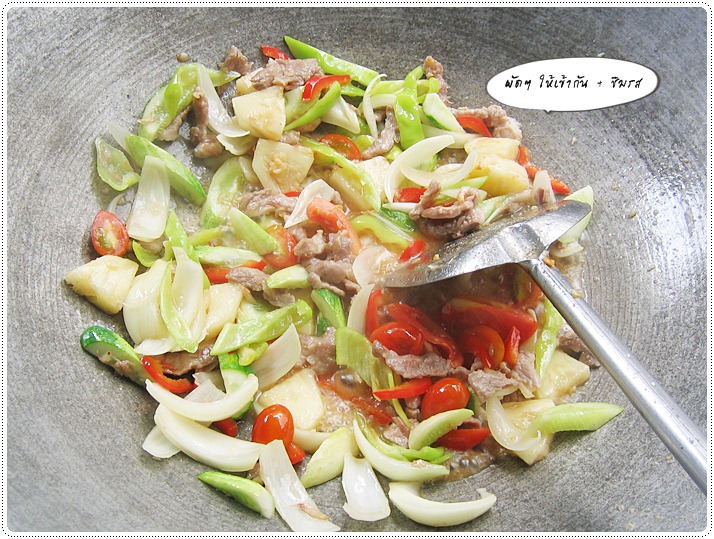
เติมเครื่องปรุงเสร็จ ก็เร่งไฟให้แรง (แต่ไม่ต้องให้แรงจนเป็นผัดเปรี้ยวหวานไฟแดง) .... ผัดให้เครื่องปรุงรสต่างๆ เข้ากันดี  ก็แอบชิมรสนิดนึงค่ะ ว่าเป็นรสชาติเปรี้ยวหวานแบบที่เราชอบไหม  หากขาดอะไรไปก็เติมเพิ่มเลยนะคะ... จากนั้นก็รอจนเดือดปุดๆ ในกระทะอีกที และผักสุกแบบที่ต้องการ  (บางคนชอบสุกแบบกรอบๆ บางคนชอบสุกแบบผักนิ่มๆ) ... ก็ปิดไฟเตา ตักขึ้นใส่จานได้เลยค่ะ
ป.ล. แม้จะทำสูตรเดียวกัน แต่รสชาติเปรี้ยว-หวาน ของพิมกับเพื่อน ๆ อาจจะต่างกัน เพราะสับปะรดและน้ำส้มสายชู ที่มีความหวานเปรี้ยวไม่เท่ากันอ่ะค่ะ  เพราะนั้นเพื่อนๆ ทำแล้วอย่าลืมชิมด้วยนะคะ ^^
http://pim.in.th/images/all-side-dish-pork/sour-and-sweet-stir-fry/sour-and-sweet-stir-fry-22.JPG
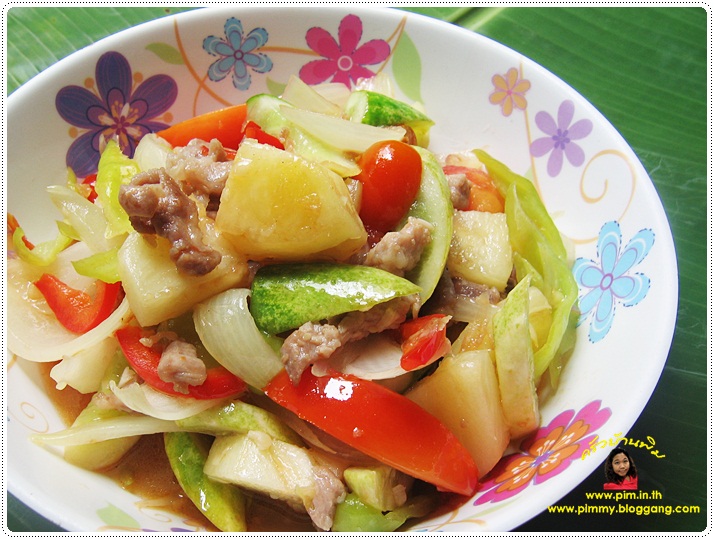
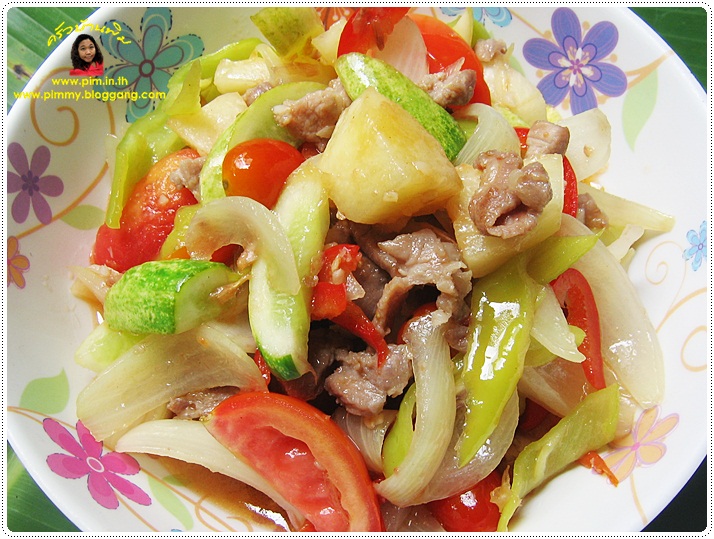
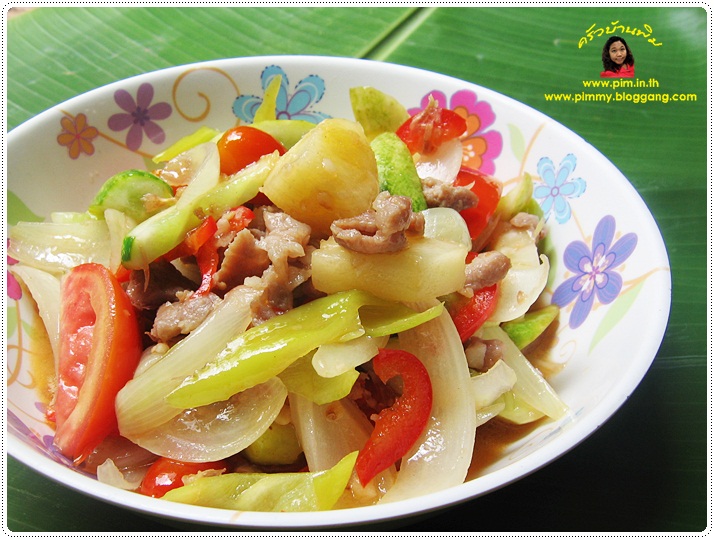
และแล้ว...เราก็จะได้ผัดเปรี้ยวหวานแบบไทยๆ เราออกมาหน้าตาประมาณนี้ล่ะค่ะ  .... ขอบอกว่าอร่อยมากค่ะ (ชมตัวเอง หุหุ) พิมกินคนเดียวหมดชามเลย (แต่ไม่ได้กินข้าวน๊า) ^^
http://pim.in.th/images/all-side-dish-pork/sour-and-sweet-stir-fry/sour-and-sweet-stir-fry-05.JPG
หากเพื่อนๆ อยากลองไปทำดู แต่ไม่กินหมู หรือไม่มีเนื้อหมู จะใช้ตับหมู (ต้องหั่นแล้วเอาไปลวกให้สุกก่อน)  ใช้เนื้อไก่  หรือแม้กระทั่งเนื้อวัวแทนก็ได้นะคะ
http://pim.in.th/images/all-side-dish-pork/sour-and-sweet-stir-fry/sour-and-sweet-stir-fry-07.JPG
ส่วนผัก ... บางคนอาจจะอยากกินข้าวโพดอ่อน เห็ดหูหนู ก็ใส่เพิ่มลงไปได้ค่ะ  ขอให้เป็นผักที่กลิ่นไม่แรงมากก็พอ  ... (แต่บางคนเค้าก็ว่าข้าวโพดอ่อนกลิ่นแรงนะคะ อันนี้ก็แล้วแต่จ้า)
http://pim.in.th/images/all-side-dish-pork/sour-and-sweet-stir-fry/sour-and-sweet-stir-fry-06.JPG
ยังไงหากเพื่อน ๆ สนใจลองไปทำดูกันนะคะ ..... อ้อๆ แถมอีกนิด หากใครอยากให้สีของน้ำเปรี้ยวหวานออกสีแดงชมพูสวย ๆ และชอบรส+กลิ่นของซอสมะเขือเทศ  จะใส่ซอสมะเขือเทศเพิ่มลงไปสัก 2 ชต. ก็ไม่ผิดกติกาแต่อย่างใดนะคะ (แต่พิมไม่ชอบจ้า)
http://pim.in.th/images/all-side-dish-pork/sour-and-sweet-stir-fry/sour-and-sweet-stir-fry-03.JPG